Friday, November 29, 2013

Bluetooth "Sonic" Screwdriver, Mark I

People have been responding to the 50th Anniversary of Doctor Who in various ways. Apparently mine is to build Sonic Screwdrivers. The Fourth Doctor (Tom Baker) once mentioned in passing that his screwdriver had eight computers in it - an impossible throwaway line in 1978.

This one has three.


First assembled tests. Audio is a very quiet.


What's inside: Arduino 16Mhz computer, MP6050 accelerometer/gyro,
LiPo battery and boost power converter, speaker, LEDs, and Bluetooth module.

This wasn't entirely the original intention, but things just kind of escalated. (As they do.) The original prototype looked like this:

Arduino Leonardo, LCD screen, and MP6050 accelerometer/gyro.
But once the MP6050 was proven to work to my satisfaction, I wanted to build it into some kind of hand-held device that I could properly wave around without smashing. 

There is a slightly serious background to this - I am a computer scientist with an interest in novel human-interface devices, and I'm planning to build some robots (automated telescopes and quadcopters) over Christmas that use the same sensor tech in their inertial navigation.

Think of this as the brain of a flying droid, but without the motors. A safe starting point.

Oh, and it has a bluetooth module in it as well, so theoretically one can connect a serial terminal to the screwdriver from a mobile phone, but that's proving a little trickier than I'd hoped. If you like, you can accuse me of essentially re-inventing the wii-mote. And an IR LED, so it could function as a universal remote if I programmed it to.


I find it makes sense to build a prototype, write some "hardware test" code that exercises it in some kind of demo mode, and then rebuild the hardware (with the software already installed) in stages so you can incrementally test that everything is working.

'Blank' case modelled roughly on Pertwee-era sonic.

This is all the internals assembled. Once I knew the rough size, I started making a 'case' out of PVC pipe, which is a cheap and easy material to work with. And I happen to have various sizes lying around the workshop.

Finding an appropriate "button" was one of the hardest parts. Eventually I pulled the switches from an old mouse and installed two.

Buttons added, channels to let the glowing out,
and a thingie for the end. Charging up.

The LiPo battery is charged directly by the Arduino, so some calibration was needed to make sure it was treading the fine line between adequately charging, while not allowing flames to shoot out sideways.

Mostly assembled, just before the video. Lights being tested by USB commands.

I've since cut a hole for the battery power switch, and plugged up the open end with Silicone (which still lets the Arduino glow out) and once the new owner paints it, I'll post some final photos.

Only one thing hasn't quite turned out - the internal boost converter is actually providing better regulated 5V power than my computer does over USB. (Unexpected!) That means that when plugged in, it still preferentially draws power from the internal battery, which is not what one wants. Hence a hardware switch to isolate the battery. I will revisit this.

Of course, the hardware is in many ways the easy part. The point was to create a new platform for testing out ideas. The software has already taken far longer. The total hardware cost has been under $50 - it's essentially 'disposable'. But if you added up all my time, and costed me at my usual contracting rate, this is a multi-thousand dollar device. A bespoke artifact.

In the end, that's why The Doctor's sonic is so damn cool - Four hundred mythical years of software development, moved from device to device. That's a deep and insightful truth about Computing Science. Hardware is transitory, but code can be eternal.

Thursday, November 21, 2013

Review: More Arduino Motor Modules: A3967 EasyDriver, HG7881 "Dual H-Bridge", and ULN2003A "Stepper Driver"

Summary

Here we go with another three cheap and cheerful modules from around eBay labelled as "Motor Drivers for Arduino".

  • A3967 EasyDriver     $4.89
  • Dual HG7881 H-Bridge     $2.30
  • ULN2003A "Stepper Driver"     $1.78


The short version: I made smoke come out of the HG7881 under fairly normal operating conditions. The ULN2003A barely survived, probably because it can't go in reverse. The EasyDriver is a beautiful device, and the hands down winner, so long as you're driving a small stepper motor.

I'm still looking for a good solution to spin a couple of toy motors, though.

Schmalzhaus EasyDriver


So, let's start with the "winner" in terms of overall quality. This device just kept surprising me with it's robustness and adaptability. So long as power was applied somewhere, in some form, it glowed it's happy red LED and spun the motor around. 5V from the Arduino's USB Raw line, 12V from a plugpack, 6V from some batteries... whatevs. 

This is how it's done. 

Once powered, you only need to run the "Step" and "Dir" lines to the Arduino. All the rest are tied via pullups/downs to sensible 1/8 microstep defaults. In a real application I'd also want the reset and sleep pins under control for proper homing and power management, but that's a personal thing.

The pin layout was strange at first, and seemed scattered around the board, but I understand the reasoning now - separating all the digital and motor power paths so that shorting any two adjacent pins is relatively benign.


This kind of sensible-ness probably comes from the fact this open source design is on it's sixth iteration, going back as many years. All the bugs and weakness have been sorted out.

Unsurprisingly, it's another Allegro chip in there, literally along the same lines as the A4988 "StepStick" driver I reviewed last time, but an older device. And while the A4988 does seem to be able to throw more power around than the A3967, it also has a higher minimum required voltage.

That's really the principal difference: The A4988 doesn't operate below 8-9V, and the A3967 tends to overheat when you go above.

The newer A4988 is therefore for cases where 12V is your primary supply voltage, as in mains-powered devices like the RepRap. But the EasyDriver works best in the 5V range, and does it magnificently. In fact, it's the only driver I've used that could happily spin a stepper motor using a 4xAA battery pack.

So it will generally function from the same power source driving the Arduino, and uses fewer pins than anything so far. "EasyDriver" is the perfectly correct name.

It even has mounting holes. Luxury.

HG7881 Dual H-Bridge

So, here's one thing this chip is missing -  thermal shutdown. I know this because I managed to release the magic smoke from one of the H-Bridges during a "back-and-forth" stress test (reversing the motor direction about twice a second) After about eight cycles the motor stopped, and in the silence and stillness I saw the tiny puff of smoke rising into the air before my nose. Like an ant had lit a minuscule cigar in condolence.

He's dead Jim. And then the connector desoldered itself, and flew into my parts bin.

That's a shame, because otherwise this is a cool little module. It does the basic task of spinning a motor in either direction, and even handles 1Khz PWM speed control. But I burned it out with a 4.8V battery pack and a Tamiya toy motor by reversing direction a few times, and that's why it costs $2.

What I was hoping to use it for... but it was too much power. Too much responsibility.

Although, granted, this wasn't a test I subjected the AdaFruit Shield to. (I really doubt it would survive any better.) And in fact, I would rank this above the V1 Motor Shield, since it was able to keep the two motors running at constant max speed while generating less heat. (I'd stopped the stress test on the AdaFruit well before then.) And it's easier to control - only four pins needed.

The test setup that killed it. Side by side comparison torturing. Joystick for variable killing control. 

What this module might be good for (and I'll have to try it later with the remaining channel) is replacing the guts of small RC servo motors, to convert them for continuous rotation. Those DC motors are a whole level down in power requirement, and might be the right match.

The module might even be appropriate for its advertised use - driving stepper motors - so long as the motor was extremely small, and very slow. 

Moments after death. Alas, no visible mark or melted plastic.
It would be interesting to see what this chip can do with better thermal management, but the board design won't let you slap a heatsink across it without shorting things. And those little packages are really bad as dissipating heat anyway.

ULN2003A "Stepper Driver"

Ha. "Stepper Driver". I've had some past experience trying to build stepper drivers out of the ULN2003A. Let's call it what it is: a block of power transistors, limited by the obvious problem with putting seven power transistors onto one die - you can't really have more than one turned on at once.


It's probably only my past experience with this chip that allowed the module to survive the tests and keep its magic smoke. I'm pretty sure it doesn't have thermal overload protection. (I don't intentionally set out to destroy hardware, but I do need to stress test before putting anything unknown into my droids.) 

This chip was old 20 years ago. And that's kind of why it keeps turning up. It was never really intended to drive motors, (remember relays?) but "unipolar" stepper motors can be thought of as four relay coils, so some wag used it in a few early dot matrix printers, and so "stepper driver" it became.

But don't use it for that. Really. I hooked it up to a very similar stepper motor to the one I attached to the EasyDriver, energized one coil, and had to shut it down five seconds later when the heat level hit critical.

It's not very good for driving DC motors either, mostly because it can't reverse the current flow, so it only goes forward. It did out-survive the HG7881, probably because of that fact, since the equivalent "stress test" was half as stressful. (Plus the '2003 only has to manage current on one side of the motor - the H-Bridge cops it coming and going.)

What you can do with the dumb 'ol ULN2003A is all kinds of weird things the more specialized chips would freak out about. For example, the spindle motor of a hard drive is kind of odd - it's technically a three winding "stepper" with a common terminal. (Almost a direct ancestor of modern Brushless DC motors) so you have to pulse three pins in sequence to make it spin. 

I wanted to try it out as a galvanometer, so I used the ULN2003A to keep one coil energized, and applied 1Khz 'chopped' DC speed control to another winding to vary the current.


It did work - I could get the "needle" to swing to positions between the normal poles (like fine-control microstepping) but the repeatability was awful. Obvious in retrospect, given the spindle mass. Good 'galvos' have tiny spindles.


It has all kinds of other uses too. Powering a dozen LEDs. A simple speaker amp. As a level shifter to drive solid-state relays. For $1.80, it's a very versatile block of power transistors, and dumb-as-a-brick can have some advantages...

It's just not very good for moving stepper motors around.

Update:
I recently reviewed the L298D module, and was impressed.

Sunday, November 17, 2013

Review: Arduino Motor Drivers - AdaFruit Motor Shield vs RepRap StepStick

Summary

While the old AdaFruit Motor Drive shield is cheap and versatile, it's also not very good. It struggles with even small motors, and if you want anything more sophisticated than "forward" and "back" then it's just not going to perform well.

The "StepStick" board is based on a more advanced chip that amazed me with its power. (I thought thermal shutdown was for certain, on a device that small without heatsinks... I was wrong.) But it is specialized to do one job - push stepper motors - and therefore lacks some flexibility to drive other motor types.

The A4988 is simply superior technology. Once you go DMOS, you realize how much BJT transistors suck. And having built stepper drivers before, I can appreciate its dead-simple microstepping interface. But the Motor Shield is easier to use.

Experimental Setup. AdaFruit motor driver + /Leonardo on top,  
Micro Pro + StepStick on the bottom.

Moving Stuff Around with Arduinos

Over the last few weeks, I've been putting some "robots" together. This is the first time I've added Arduinos to the mix, and so I wanted to try out some of the cheaper and more common hardware on eBay and see if it was any good.

I used various old motors and power supplies I had lying around, but the Arduinos and motor drivers are new, and barely weeks old at this point.
  • Arduino Leonardo (clone) $12
  • AdaFruit L293D Motor Shield (clone) $6.15
  • Micro Pro (clone) $7.30
  • RepRap StepStick (clone) $3.99
All the gear tested came from ShenZen or Hong Kong via eBay, and I'm generally very impressed with the quality and value of what I've received so far. A lot of this gear is often cheap because it's considered "flawed" in some way, but usually this is a result of design or specification, and the kind of classic mistakes (connectors on the 'wrong' side, from the point of view of convenience) that we've all made. The actual build quality is great.

AdaFruit Motor Shield (v1)

The AdaFruit motor shield is a good example. For $6.15, it is a lot of physical hardware. But the design isn't the best, and has dated pretty badly. I found it necessary to trim the pins on the connector blocks with some side-snips to make the shield fit correctly. (And I was also concerned by the sub-millimeter clearance between the M4 connector and the ICSP/SPI pins on the Leonardo.. Hmm.. high volts right next to the CPU. Safe!)

AdaFruit has actually stopped making this version - the v2 shield is much better in every way. But the simplicity and availability of the components means there will probably be clones made for years.

What Leonardo Compatibility Issues?

Astute readers might know that the v1 shield is not officially supported on the newer Leonardo, but I have a few skills, so that situation didn't last long. Physically it's compatible, but the Leo is a little different internally from the Uno or Nova and the stock library makes some assumptions. 
I have a new class in my Droid library called the "Motivator" that can PWM any pin(s) for DC current control. Since it's the pin/PWM/Timer assignments that changed most on the Leo, this was the 'secret sauce' needed to make it run all four motors in DC chopper mode. If anyone needs the code, drop me a line.

Arduino Leonardo hidden by AdaFruit Motor Shield (v1)


And generally it works, but those L293D's get hot. And 'speed control' doesn't necessarily help - the transistors generate a lot of switching heat, so PWM can make things worse


Classic Tamiya toy gearbox, with good quality DC motors.
Sounds like banshees in a sack when running.
The board was simply not capable of driving all four motors at once, or even two at once for any length of time. But in a "classroom" situation where you need to slap something together in 10 minutes which won't run for much longer than that, this is a fairly foolproof solution.

But for permanent emplacement, I just wouldn't trust it. And it uses up (or makes inaccessable, like the SPI connector) too many other resources that a 'real' project would need.

RepRap "StepStick" A4988

It took me a while to believe that the single chip below completely outperformed both L293D drivers in the Motor Shield, but it does. Allegro really need to be congratulated on producing a first-class device, and whoever at the RepRap project picked it as their driver of choice should also be given a round of applause as well.
The Allegro A4988 Stepper Driver chip on the "StepStick" RepRap board.
The module drives bigger motors with more capability, requires fewer pins on the Arduino (always a critical thing) and frees up other internal microcontroller resources like timers. I ran it at twice the voltage of the Motor Shield (12V instead of 6V) with greater current. It has the usual modern array of thermal and short protection, which I inadvertently tested by wiring up the stepper wrong.


Pulled from an '80's era Epson 160-column dot-matrix printer.
They don't make 'em like they used to.

This was not the first stepper I tried, but the module was 'overdriving' my smaller motors and making them heat up (while remaining stone cold itself.) so I wanted to see how large it could go. Driving this big motor at full current (actually more than twice it's rated power) finally got the A4988 warm. Not hot, just warm. 

I tested out the 1/16 microstepping, and it was smooth and precise. (little steppers are more jittery, but these big ones have enough spindle mass to microstep perfectly.)

I've also tried using the module to drive just a single DC motor - which does work quite well, although you are essentially sacrificing half the chip's capability by only using one channel. (Because the other channel is phase-linked, it is mostly useless for driving a second DC motor unless you have a "tank" configuration where sharing power between two wheels might make sense)


The "Micro Pro".
Leonardo equivalent, but a fraction of the size.

If you're wondering where the Arduino is, it's the other tiny board. I am loving the "Micro Pro". I lose two pins compared to it's big brother, but also 9/10ths the volume. Otherwise, it is exactly the same Atmel chip that's on the Leo.

The issue with the A4988 is that it's not a beginner's device, and it's not targeted at Arduino. There are no "libraries" to drive it, (although it's pretty simple) so I wouldn't ask a classroom full of kids to add them to their projects unless I wanted a lot of magic smoke to come out of drivers, arduinos, or even host PCs when they got the 5V and 12V lines mixed up.

But for old pros, it's a beautiful little chip, with many possibilities.

Conclusions

While the A4988 is a better driver, I'm coming to the understanding that both of these technologies have had their day. The only reason to get either is because you have a drawer full of old-school motors and projects already provisioned with them.

If you're designing a new device, then you want to use BLDCs - brushless DC motors - which are essentially the love child of both the previous technologies. Brushless motors are very much like three-phase steppers (instead of two-phase) with less "detents", or like DC motors with an 'electronic commutator'. These are hooked up to ESCs (Electronic Speed Controllers) that decode a digital PWM signal and drive the motors with momentary currents of 20 or 30 amps.

These BLDC motors are more quiet, efficient and reliable than the previous generation, thanks to modern neodymium (and dysprosium) magnets, and our quantum FET mastery. Kudos to the Remote Control model community for pushing the envelope there.

If you look inside an ESC, you will often find what is essentially a commercial Arduino (Atmel 328 being quite popular) in charge of a bank of MOSFETs. A motor driver shield plus microcontroller in one. For $7. It's really hard to beat that. Some are reprogrammable.

If you're designing a new project, start with them. Forget steppers and DC. They're so last millenium.


Monday, November 11, 2013

Ultrasonic, Man!

These HC-SR04 ultrasonic ranging modules work brilliantly. They have a cone of about 40-60 degrees in front of them where pretty much anything - ceiling, coffee cup, pen, cloth, hand - will bounce the signal back and give a clear, clean, to-the-centimeter distance reading of the closest obstruction.


The only exception seems to be hitting smooth surfaces at high incident angles - in which case the return echo is bounced too well, and physically misses the receiver.

Did I mention I'm building a droid? Technically, a child's toy for Christmas, though I want it finished long before then. Actually, I'm building multiple "robots" at the moment, but this one is worth documenting.

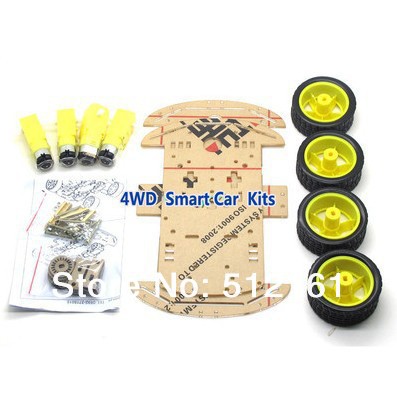
eBay and the internet is making this a much easier task than it used to be. For $25, I got a complete 4wd "smart car chassis". I'm really hoping it arrives this week, since most of the rest of the pieces are already here and working.
This follows my current approach to robotics: Start with the sensors. It doesn't matter how fast you can go, if you don't know where you are.

This droid will have at least three major 'external' sensors:
* Ultrasonic Ranging Module
* Digital Compass / magnetometer
* Infrared Receiver

as well as a couple of internal ones:
* Temperature
* Time
* Power Levels (maybe)

I've had each of these working individually now, but I'm learning one of the hard rules of Arduino development - combining devices together with one microcontroller gets exponentially difficult, due to limited shared resources. Making all of those parts work together at once is taking some programming art. I've got it covered, though.

A new approach to programming toys.

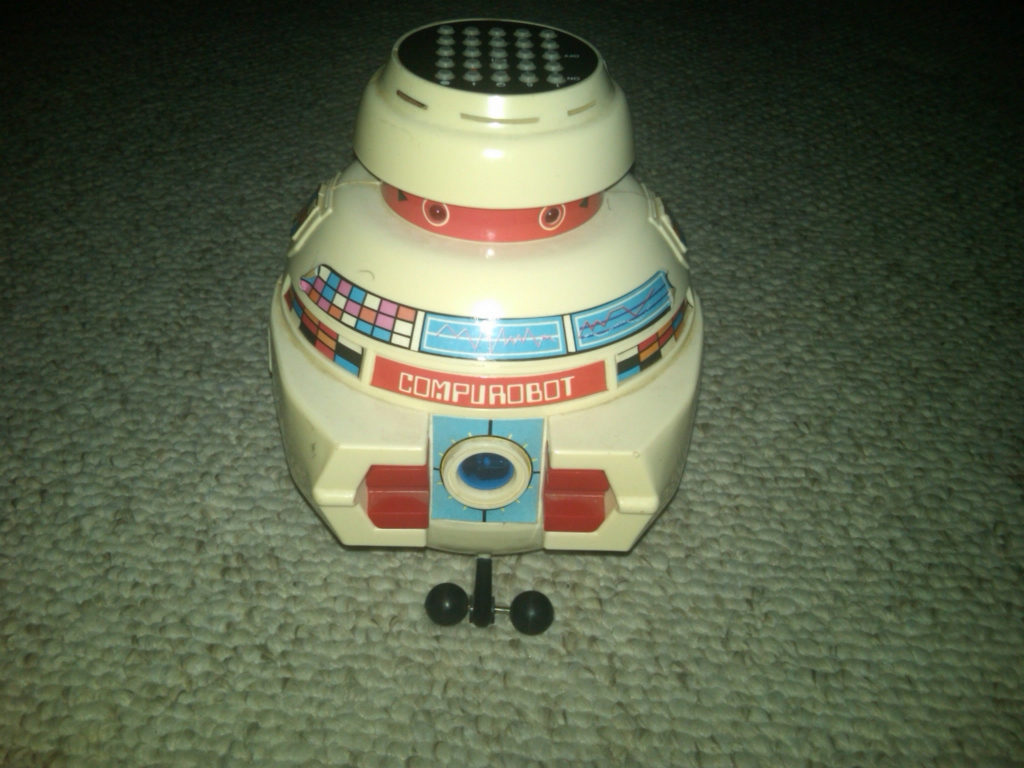
When I was but a little programmer, I really wanted one of these:


To the point that I read and practically memorized the manual, while standing in the shop. I couldn't physically have one, but at least I could carry away the idea. In many ways that toy embodied programming as it was in the early 80's.

But as brilliant as it was (I should find out who designed it, and drop them a line... ooh, Nolan Bushnell might has been involved...) programming has changed considerably. I do not think an exact recreation of that toy would be beneficial to an understanding of modern computers. Here's what I mean:

Vincent implemented what was essentially a stripped-down BASIC (or perhaps LOGO) without loops or conditionals. A simple series of instructions like "Forward 80" or "Left 2x60" that would inevitably lead to a tumble down the stairs, which is why I assume that not many survive.

A robot like that, even with IF and REPEAT statements, spends most of it's time doing 'nothing' but waiting for the timer on the current command to expire. Such droids are deaf, dumb, and insensible for most of their lives. And they act like it.

The only way to make such a 'bot respond to two things at once is essentially to write your own mini-scheduler for each unique combination. Fun!

But modern programming is all event driven. Not even multitasking, anymore. Node.js has shown us what happens if you stay single-threaded but make every call non-blocking - performance increases, and resource use decreases.

So I have reduced that concept to it's essentials. My droid's "brain" is composed of 128 "signal" slots. Reading a signal is identical to reading a value out of an array, but changing a signal will cause any "codes" attached to that signal to execute, either "now" or "later".

The "later" timeout is probably going to be globally set to 1/10th of a second in early versions, but could be faster for droids that need more temporal resolution. What is critical is that the 'later' timeout is reset if another write to the signal is performed. (The 'now' codes are still executed immediately.)

There's an excellent reason for all this which involves a lot of computing science. With just those two 'event' types, we get a universal system.

A "code" is a set of arithmetic instructions almost identical to the standard accumulator logic of a pocket calculator, plus an if/skip statement.

Loops are apparently not implemented, but any code can write another value to the signal which triggered it, which will cause it to trigger again. A classic "If signal>0 then signal = signal-1" will keep the code 'looping' until the counter gets to zero.

Infinite loops are not a bug in this environment. They are an essential way of getting things done. The interpreter is designed so that every signal could be "looping" simultaneously.

This creates a network of event-driven fragments of code. There are no explicit functions calls either... code simply triggers other code by writing to signals. There are no parameters to pass - needed values are read out of the signal array.

If you're into Comp. Sci, this is an extreme mash-up of core OCCAM and Javascript concepts.

This all sounds a lot more complicated than it will appear. "Codes" are simple lists of calculator arithmetic instructions (with the 128 signal registers being equivalent to memories) And each "Signal" is just two lists of codes, to run now and later. That's it. Universal turing machine.

I'm hoping I can go entirely "symbolic" for this. (English is an assumption... "pre-linguistic" programming is possible.) Since only 128 signals and 64 code scripts are possible, each can be assigned a unique "icon" instead of number - to be redrawn by the droid's owner to suit their conceptions of what it means or does.

This "digital nervous system" can be patched and changed in real-time without touching all the other signals or codes. Improvements to the droids "program" can be made in-the-field with a remote control, without the tether of a programming cable or IDE. (Hey kids! Who wants to use an Integrated Development Environment? It's totally fun! Where are you going?)

The droid will slowly accumulate it's responses over weeks and months (stored in EEPROM) not the "tabula rasa" approach of Vincent, who lost his memory on every reset and battery change.

No matter what cool new tricks you teach it, the droid should never forget that if it can't see the floor right in front of it's face, it should stop going forward. (That's the third law of robotics!) Or what to do when power is low. Or how to fire the Lasers!

Toys are tools to spur the imagination, and our understanding of the world. Good toys are ones that can be woven into existing play, that can offer possibilities rather than constricting choices. That is a very fine line to walk when dealing with robots. I think the answer is to be very clear about limitations, but be as free as possible within them. Pre-approved capabilities, but not pre-approved uses.

I'll be releasing the code as soon as it's done. If you have an Arduino-based "collision avoidance robot" (not the official arduino robot - I don't have one of those...) made out of a Leonardo/Atmega32u4, random cheap sensor modules, and a couple of motors, then you essentially have the same platform I'm building for. I personally think a compass is critical, (more than axis encoders) and you might even want to go for a full 6 or 9 DOF accelerometer/gyro/compass module. (GPS is probably way too much... probably...)

Oh, I've also written a "Beeps" module which makes a wonderful range of droid-sounding noises. I am genuinely astonished at the personality that a few warbled squeaks can imbue. I let it randomly generate "phrases" for a while, and kept the best sounding ones.

Wednesday, November 6, 2013

Gyroscopic, Man!

Have you seen how good accelerometer technology has got? I just bought three for $12. They have 16-bit resolution, and programmable range from 2 to 100G!

The tech has been improving ever since Nintendo introduced their Wii Nunchuck. Consumer mass production plus improving technology have driven some significant advances.


The techno-secret is in the modern ability to etch "Micro Mechanical Systems" (MEMS) onto a silicon wafer, as well as electronics. Tiny metal-coated cantilevered beams, supported on silicon pivots, with masses measured in the picograms.


I remember the original demos of this technology - micro-motors that seized up after ten seconds of runtime. A set of balance-scales that could weigh individual molecules. It was cool, but there didn't seem to be any obvious applications outside the chem lab. And silicon wafer tech works best when it's all sealed up, so it seemed like a mismatch of needs. Little did we know...

Turns out if you leave the molecule off the end of the tiny mass-scale, what you have is an inertial sensor. If the whole set of scales is moved to and fro in a way which affects the balance, then it's measurement will reflect the acceleration it's under. Boom, you have an accelerometer. You'll need one for each XYZ axis, but hey, if we're etching them on a chip that's not really a problem. (Well, maybe the Z axis...)

The sensor in the Wii Nunchuck is now an early-generation analog model. The latest devices have better everything, including a major innovation - gyros!

Knowing how fast you are accelerating in the three cartesian axes is very useful - but there's a missing set of dimensions - rotations. If you rotate a 'simple' accelerometer, it has issues distinguishing that from a lateral movement. A sideways impulse and a twist will both change the vector direction of acceleration due to gravity (hereafter called 'down') by roughly the same angle, but the twist will generally leave the vector the same length. But this subtle difference can be hard to distinguish through sampling noise.

However; if you have two accelerometers a distance apart, then you can measure the instantaneous differential, which will correspond to the gyroscopic motion. Their correlation will correspond to the pure acceleration.

That's how good the sensors have got. They can measure this difference across the chip. Barely two millimeters.

This is powering a whole new generation of mechanical devices which know exactly where they are, and how they are moving. Exactly. Better than you do. Better than GPS, in a relative moment-to-moment sense.


One offshoot is the amazing new "Toy Quadcopters" you can buy, (I just did) that sit in the air like a small flying drinks tray. Or other little home-made robots I've seen that balance on two wheels in the same manner as a Segway. (and can also carry drinks on a tray. Robotics people clearly get very thirsty.)

I'm going to use them on my telescope (along with a digital compass module) to tell which way it's pointed, and how it's moving under the influence of the motorized mount. This bypasses all the normal crap with axis encoders, which is excellent if you want to count motor shaft rotations. (because all your mechanics are perfect, predictable, and wobble-free. Ha!) That's the only case where taking measurements half-way through the mechanical chain can be expected to approximate the thing you really care about - where the optical tube is pointed relative to 'down' and 'north'.

16 bits (well, 14 really, on the 2G range including plus and minus sides) is a LOT of 'down' accuracy. As good as counting stepper increments before gearing, according to the math,

I'm also building some toy robots with the tech, but that's hardly new. Also perhaps a rugged 'wand'-like UI device that uses gestures to change settings, rather than buttons. Buttons are expensive. And big. And so... binary.